Monday, August 31, 2009
Late summer joys/Late summer travails
Joy: Fresh beets. I tried to save them to make beet pickles with, but I was too hungry. They made an awesome beet/orange salad.
Travail:
I've neglected the weeds for ages. There is a walkway under there. Really. I have to pull the California poppies out. They are truly past their prime.
Joy:
Volunteer honeydew!
Travail:
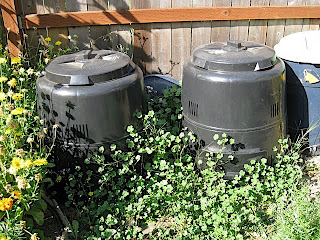
Oy. The compost needs stirring in a bad way. It's growing weeds, which I am told is the sign of Compost That Is Not Hot Enough. I call it "nurturing compost."
Joy:
Plums! Yums!
Travail:
The wasps are doing keg stands on the bushels of overripe fruit dropped onto our parking pad. And they are trashing the place. Look at that hammock stand they dragged in...
Thursday, August 27, 2009
Gardening is everywhere!
Occasionally we get magazines at our house that we never signed up for. We're not sure why they keep coming, as we have offered them no encouragement. But there they are.
There is one unasked for magazine that I find it to be of, um, "questionable" merit. It is full of product advertisements and interviews with women who are wearing less than what I would wear, were I to be interviewed by a magazine. (Note to self--ask about clothing requirements if ever contacted for a magazine interview.)
Since my husband never cracks the cover, despite much ribbing from me, it falls to me to do the research in the name of media awareness. (It's a tough job, but someone's got to do it.) And in the most recent version of this magazine, I was totally shocked to find an "article" on gardening.
Gardening! Fortunately for the reputation of the magazine, the article talks about how houseplants can make you look more appealing to women. It rates the plants on Looks, Care, and "Lady Props". Included are tropicals, topiaries (topiaries??), succulents, and orchids.
Orchids were the highest scorers in the "Lady Props" category, perhaps unsurprisingly. However, the authors of the article advised that one should "expect to toss it when the flowers fall off."
May I recommend to the authors of this article our forthcoming book, Bloom-Again Orchids: 50 Easy-Care Orchids that Flower Again and Again and Again? Having an orchid is fine, but having an orchid that has bloomed every year for the past five years? That's some serious Lady Props.
Chani West-Foyle, Marketing Associate
Wednesday, August 26, 2009
FarWest Show recap
Timber Press attended the FarWest show in Portland, August 20-22. It's amazing how convention centers are transformed during nursery trade shows. The floors are covered with carpeting, and there are plants everywhere. The florescent lighting helps you remember that you are indoors, but beyond that, there are trees and grasses and flowers, oh my!
We spent most of our time at our booth, ringing up purchases and testing our knowledge of our books.
(In real life, our sign did not reflect that much glare. Yet another example of life not imitating art.)
During a slow period Saturday afternoon, Kathryn and I went into the show to check it out. We found a random wind turbine, and Kathryn stood next to it for scale.
Then benches were decorated with facts. I was given an odd look for taking a picture of a bench. I persevered.
There was a central display with new introductions.
Black Eyed Susans
Petunia, "Pretty Much Picasso"
Several of our authors were at the show - Ray Evison, Sean Hogan, and Mike Dirr all made appearances at our booth. Ray also modeled (with a big smile!) his new clematis varieties.
There were lovely displays of trees and grasses from Woodburn Nursery, A&R Spada Farms, and Bizon Nursery.
Plug Connection had a gorgeous living wall display. I think it says "tessera", which means "an individual tile in a mosaic." That seems appropriate, given that the whole things was made up of small succulent plugs. It was gorgeous. I want one at home. I would just sit around and look at it all day long.
Burpee was there with a big edibles display. After the show, when we were all breaking down our booths, they gave away pots and pots and pots of basil.
The car smelled like basil all the way home.
Chani West-Foyle, Marketing Associate
Labels:
Authors,
Pacific Northwest,
Shows
Tuesday, August 25, 2009
Double Trouble Chocolate Truffle
Last night I made the Double Trouble Chocolate Truffle recipe from The Complete Chile Pepper Book.
It started easy--I had all the ingredients on hand.
The instructions were pretty easy to follow. First I put the milk and dark chocolate in a small pot.
Then I placed the pot inside of a larger pot full of boiling water. I mixed in the sugar, chile pepper, cinnamon, and condensed milk until it was smooth.
The recipe then said: “Let cool until it’s shapeable.” Hmm. I had never had to let chocolate cool before, so I didn’t understand that it took quite a while. Three hours in fact! So, make sure you start making these a lot earlier than 8 pm.
After they cooled, I shaped them into small balls (and ovals, and some other random shapes unintentionally) and rolled them through chopped pecans.
And they looked like this.
And, we looked like this eating them.
Kathryn Juergens, sales and marketing associate
Recipe from The Complete Chile Pepper Book
Friday, August 21, 2009
The Hidden Perils of Peppers?
I was reading through The Complete Chile Pepper Book and came across this useful warning:
Capsaicin, the alkaloid responsible for the heat in chiles, is wonderful for making bland foods interesting, but it is far less welcome in large doses on the skin, or in any amount in your eyes. We urge everyone to who processes chiles in any form to wear gloves when handling them. This is especially important when handling the hotter varieties, because chile burns can be extremely painful and even cause contact dermatitis, redness, and blistering of the skin.
It made me think of the funny segment Jeff Gillman had on The Martha Stewart Show earlier this year. You can watch Martha's laughter-inducing warning here.
Here's another bit from The Complete Chile Pepper Book about what to do if you burn your mouth with a pepper:
When you burn your mouth and tongue, eat a thick dairy product like cream, sour cream, yogurt, or ice cream and swirl it around in your mouth before swallowing. A protein in the dairy product, casein, effectively strips the capsaicin molecules from the capsaicin receptors in your mouth and on your tongue.
After taking in all the above warnings, I think I can safely tackle making this recipe from the book without hurting myself.
Double Trouble Chocolate Truffles
New Mexican red chile is the heat source in this tremendous treat. With the combination of baking chocolate and white chocolate, it’s exceptionally wonderful to munch on. Try substituting 2 teaspoons of cayenne powder for the New Mexican chile to heat the truffles up even more!
Ingredients:
8 ounces baking chocolate
4 ounces white chocolate chips
2 tablespoons sugar (or more to taste)
1 tablespoon ground New Mexican red chile (or more, to taste)
½ teaspoon ground cinnamon
1 14-ounce can light sweetened condensed milk
Finely chopped piñon nuts, or substitute pecans
Directions:
Use a double boiler, or fill a 3-quart saucepan three-quarters full of water, and heat until the water is almost boiling.
Place both kinds of chocolate in a smaller saucepan and melt over the hot water, stirring until smooth.
Add the sugar, chile, cinnamon, and milk, mixing until very smooth. Remove the mixture from the heat and let cool until it is shapeable.
Shape the chocolate mixture into 1-inch thick balls, then roll them in the nuts. Chill the candy in the refrigerator in an airtight tin.
Kathryn Juergens, sales and marketing associate
information and recipe from The Complete Chile Pepper Book, available in October
Labels:
Food,
Garden Remedies,
How-To
Thursday, August 20, 2009
Pacific Golden Chanterelle
The Pacific Golden Chanterelle, or Cantharellus formosus if you’d prefer, is one of the most commonly foraged mushrooms. They are easy to find in the moister parts of Pacific Northwest and in season from early summer until late fall. If you are planning a weekend foraging trip, find a few to make this recipe.
Mushroom Cream Sauce
1 teaspoon olive oil
3 tablespoons butter
3 cloves garlic, minced
1 shallot, diced
2 pounds chanterelles (or morels in early spring), roughly chopped
1 cup cream
Sea salt
Freshly ground black pepper
Crushed red pepper flakes
1. Heat a nonreactive pan over medium heat. Add olive oil and butter. When butter is melted, add garlic and shallots and cook until soft.
2. Add mushroom and sprinkle with salt. Stir and sauté until mushrooms are well cooked.
3. Add enough cream to cover mushrooms halfway (add more if necessary). Stir and cook until sauce is thickened.
4. Add salt and peppers to taste. Pour sauce over pasta, rice, polenta or potatoes, or just enjoy it with bread.
Kathryn Juergens, sales and marketing associate
Images from Mushrooms of the Pacific Northwest
Recipe from Northwest Vegetarian Cooking, available May 2010
Labels:
Edibles,
Food,
Pacific Northwest,
Summer
Monday, August 17, 2009
Universal Plant Achievement of All Time!
I have to confess I’m obsessed with Horms™ #4 SUPERthrive 50-in-one. If you’ve ever seen a bottle or ad for this amazing product you’ve never forgotten it. We all see plenty of ads in a given day--“Number 1” “Recommended by four out of five dentists”, etc.--but SUPERthrive beats them all. The ads scream the most amazing claims:
“World’s # 1 Top Plant Supply”
“World Champion”
“Best Stuff or Product in the World.”
I absolutely love these outrageous claims, and I tried the product in the first place because they’ve made such an impression. What is SUPERthrive? It’s a mix of 50 vitamins and hormones you add to your watering can, purportedly decreasing plant stress and increasing survivability of transplants. Any self-respecting academic horticulturist will tell you there is no proof that plants can even metabolize vitamins. My skeptical friend and Timber author Sean Hogan scoffs that SUPERthrive only seems to work because you have to start watering your plants to use it. Nonetheless, most people I know who have tried it swear by it--even as they giggle nervously about the ads. So, do I sound like a hick if I admit I go right for the SUPERthrive bottle when one of my plants looks yellowed or stressed out? I can honestly say I’ve never lost a plant when I’ve used it. You heard me right. I’ve never once used SUPERthrive on a sick plant and didn’t see it recover. Maybe the SUPERthrive ads are the only ones that are really telling the truth. It’s something to think about.
Neal Maillet, publisher
Labels:
Garden Remedies
Friday, August 14, 2009
Other People's Gardens
Before I graduated from college, I had a bountiful list formulating in my head of all the things I wanted to do with my life. Things like, travel the world and write an award-winning memoir! Become the next J. K. Rowling! Get an MFA in creative writing! Oddly enough, Live at Home in My Parents Basement was never added to my list of aspirations.
But here I am doing exactly that. My diploma is a year and a half behind me, my school loans are doing a frantic dance in front of my eyes, and yet my junior-high school ivy wallpaper is still singing me to sleep at night. It is not exactly delightful.
On the other hand, there are some perks that come with living at home, one of them being the fact that my mother is a fantastic gardener. She plants delicious vegetables, grows roses and so many other flowers that I couldn’t begin to name them, keeps the grass green, and makes our house look far more amazing than any other house on the street.
Sometimes neighbors stop by our driveway just to say, “Thank you for the beautiful work you do.”
But my favorite part of our garden is the swing. Tucked away under the filbert tree, the swing hangs in a shady, cobweb-ridden, hidden corner of the backyard. Hummingbirds vibrate their way in and out in a few short seconds, squirrels talk to each other from up above and drop discarded nut shells at my feet. A neighbor’s cat lies a few feet away in the shade of the blueberry bushes, watching me.
I do not garden. I’ll admit it. My one attempt at growing wildflowers in a pot failed miserably. But I love, love, love other people’s gardens. I could sit in them all day. And I do.
There is a healing power contained in the swing in my mother’s garden. It comes from the things I can see and hear from that spot; the quiet spiders resting in their patched webs, the way the sun shines on the white roses growing in a perfect circle of brick, even the haphazard growth of the raspberry bushes drooping with berries. The fact that no one can see me back there, staring off into space or writing in a notebook, being healed.
I might not belong forever in my parent’s basement or my childhood bedroom, but I belong in that swing. I belong in someone’s garden. Hopefully it will be my own someday. When my loans are paid……
Jessica Porter, publicity intern
Labels:
Gardening
Thursday, August 13, 2009
DIY Landscape
When my roommates moved into their house about three years ago, their backyard had a depressing, abandoned lot feel to it:
Over the last few years they have already made a ton of improvements, but this summer they decided the time had come for the major DIY landscape. Plants are a little bit like crack to them, so they knew if they got started that this was going to be a full-on binge! They picked a weekend when there was a big plant sale, borrowed a truck from a friend, rented a tiller for the day, and went to town.
I can't really take credit for helping much with this project (besides moral support)...
But they didn't need me!
Since the area right in front of the back door had turned into a major mud pit (and with two big dogs, that gets really old during our eight months of precipitation), they decided to put down a hardscape groundcover of gravel over about a third of the backyard space. And since there was a natural slope to the yard, they used a big island to separate the two levels. They rolled out the insanely carpet-like sod in the upper level of the yard, and they started planting--trees, succulents, ornamental grasses, and lots and lots of pretty flowers!
Even though there is a lot more going on in the "after" pictures, the different levels and zones of the yard actually work to make it feel larger. I am beyond impressed with the results of their handiwork to make our own personal backyard oasis.
A few weeks later, they balanced out the ornamental overload with a veggie bed built from recycled materials from the Rebuilding Center.
Shortly thereafter, Drew really personified Vegetable Love with a fresh harvest from the garden.
Mollie Firestone, editorial assistant
Tuesday, August 11, 2009
Longwood Gardens
It does my heart good to know that I can spend the day at a place like Longwood Gardens, talk about the detailed history of two species of waterlilies (well, “Victorias” more properly, of the genus Victoria) and get paid for it. I was visiting Tomasz Anisko, author of When Perennials Bloom and Longwood’s curator. Tomasz was kind enough to show me behind the scenes and tell me about plans for an upcoming book on Victoria, a genus of two plants that was all the rage--and the source of controversy and scandal--in the 19th century after it was discovered on the Amazon and named after the British queen. (French plant explorers who felt they found the plants first were none too happy with the British name--perhaps it should be the genus Napoleon?) If you’re like me, you’re vaguely aware of Victorias because you’ve seen a cheesy photo of a baby or mermaid cavorting with one of the huge leaves. Great dukes and estate owners in the US and UK competed with each other to grow the plants after introduction--you needed a savvy garden staff (they’re tropical plants after all) and a huge pool of water in which to grow them. A very enterprising publisher in Massachusetts published an oversized book in 1854 with massive plates of the plants—this book is now the holy grail of garden book collectors, with prices up to $70,000. I don’t think Timber will be reprinting it!
I’ve only seen Victorias in person a few times in my life, and I have to say that Longwood’s display is the best anywhere--they even dye the water black to show off the leaves and flowers to full effect. Longwood is also the progenitor of the best interspecific hybrid between the two species, and Tomasz’s upcoming book means to celebrate this fact and all other things Victoria. Thanks to Longwood gardens for the photos—you can read more about their Victorias at the Longwood blog.
So, can anyone guess what fish, fowl, or beast the spines on the leaves and flowers are meant to protect against? The first commenter to get it right will get a free copy of Perry Slocum’s Waterlilies and Lotuses by Timber—I’ll identify the right answer in the comments and ask the winner to send me an e-mail with a mailing address.
Neal Maillet, publisher
Monday, August 10, 2009
Pavers, Ants, and Newborns
I recently bought a house, the former owners of which apparently considered rectangular concrete pavers the height of gardening style. When I moved in, there were pavers lining the equally rectangular mulched area surrounding the Japanese maple. They were lining the curb strip that the owners had filled with rocks (nothing pairs with rocks like cement, I always say). And, bafflingly, the pavers were spaced evenly along the front edge of our yard, separating several feet of weed-infested grass from...several more feet of weed-infested grass.
So it all needs some work. And while I have many grandiose dreams of what I'm going to do with the yard (none of which, oddly, involve the meatball shrubs currently lining the front walk), I'm spending most of my time right now raising my newborn son, the reason we moved into this new house.
But I have found time to do the bare minimum of yard work, which has so far involved gaining an intimate knowledge of the root systems of the many types of "dandelions" (or at least the March-August varieties; who knows what other surprises the Family Asteraceae has in store for me come Fall). And getting rid of those blasted pavers.
In the process of digging up one of these ugly hunks of concrete, I discovered that the local ants had decided that the area right underneath it was an excellent place to build their egg room. At least, that is, until I removed the paver, exposing their many eggs to the sunlight. But I was quick enough with my camera to grab this video of the ants scurrying hurriedly (as only ants can) to move their eggs to the lower levels of their subterranean kingdom.
Todd Stadler, webmaster
Labels:
Bugs
Friday, August 7, 2009
Late Blight of Tomatoes
Home gardeners and commercial tomato producers in the Eastern and Southern US face a potential tomato crop failure this summer. The problem is called late blight and is caused by a fungus.
What are the symptoms?
There are several different fungal diseases of tomatoes, including early blight and septoria leaf spot. But no other fungus has the specific combination of symptoms on leaves, stems, and fruit that identifies late blight. If your tomato plants have all three of the following symptoms you can be sure you are dealing with late blight.
First, determine how big the spots are. Late blight spots are large. They grow rapidly, enlarging to engulf the leaf or stem in just a few days. As long as the leaf tissue is moist, the spots will be very dark, purplish-black. When the tissue dries out the spots become dark brown. The spots generally do not develop yellow haloes. If you see dark brown or purplish-black spots on the leaves that are about the size of a quarter and that get significantly larger (seemingly overnight) you should suspect late blight. Other fungal diseases cause leaf spots that are smaller in size, do not grow as fast as late blight, and are lighter in color.
Second, look for cottony-white mold on the spots, especially on the underside of leaves. In dry weather you may not see this white mold on the plant, so put an infected leaf inside a plastic bag with a piece of moistened paper towel, then seal the bag. Cottony white spores will develop within 12 hours on the tissue inside the plastic bag.
Third, look for greasy-looking, brown, firm patches on the tomato fruit. These can appear on unripe, green tomatoes as well as ripe, red ones. They are often on the stem end of the fruit but can be anywhere.
What does late blight do?
Like many other fungi, late blight fungus (Phytophthora infestans) produces millions of airborne spores that drift on the breeze. When they settle on a susceptible host plant (leaf, stem, or fruit), the spores germinate and the fungus begins to grow down into the plant’s tissues. The fungus digests the cells of the host plant as it grows, first turning them black and then brown as the cells die. The initial spots are small, but they grow larger, quickly engulfing the entire leaf. The leaf wilts and dies, hanging on to the sick plant. Soon, the entire plant dies and the fruit is ruined.
Each of the spots on leaves and stems produce millions of microscopic spores that look like cottony white fuzz. Each tiny spore is a potential new infection that can devour healthy tissue. These spores are carried to healthy plants by wind, wind-driven rain, irrigation water, tools, and people. If the weather is cool and moist, the disease spreads rapidly through many plants in the nightshade family (Solanaceae: tomatoes, potatoes, peppers, and eggplants, for example).
What is the solution?
Prevention is the only effective way to protect your plants from late blight. This disease spreads quickly, so vigilance is called for. Check your tomato plants (and their relatives) frequently for symptoms. If your plants are not sick, and late blight is in your area, protect your plants with a spray that is certified for use on organic food crops. Remember that you intend to eat the fruit of these plants. Preventive treatments include Neem oil, copper, or sulfur. Read the labels to learn how to use each product. Choose the product that best suits your circumstances.
These products create conditions on the surface of leaves, stems, and fruit that prevent late blight spores from germinating and infecting your plants. As such, they protect healthy plants. They cannot cure sick plants. Unfortunately, there is no magic bullet; not even modern synthetic fungicides can cure a plant with late blight.
If your plants are only slightly infected--with only a few lesions (spots) on leaves or stems--you must protect the remaining healthy tissue. To do so, spray Neem oil, copper, or sulfur, allow the plants’ foliage to dry, then sanitize. To sanitize means to remove infected tissue from the plants, the ground, and your entire garden. Put all the infected material into a plastic bag, seal it, and discard it in the trash. Do not compost it. You will have to be vigilant and search for new infections every day. You will also need to apply the spray again, especially if rain washes the material off your plants.
If your plants are already seriously ill with late blight you should pull up the infected plants, roots and all. Put them in a plastic bag and seal the bag tightly. Put the bag in the sun for a couple of days. The sunlight and the heat will help kill the spores. Then discard the plants, with the bag, in a landfill. Do not compost the sick plants. Get rid of them. The fungus can live in your compost pile and will be a source of new infections.
Late blight fungus can live in the soil and may even overwinter. Next year put unrelated plants where your tomatoes and their relatives are this year. Plant corn, cabbage, or squash in that location and move your tomatoes to a completely new spot. You may have a disappointing tomato crop this year, but look forward to a bumper crop next year.
David Deardorff and Kathryn Wadsworth, authors of What's Wrong with My Plant (And How Do I Fix It?), available in November
Labels:
Garden Remedies,
Late Blight,
Plant Maladies
Thursday, August 6, 2009
Right Plant, Wrong Place
I recently attended a Get Gardening! event with Ray Rogers, author of Pots in the Garden and Coleus. He spoke about many things: Color, line, form, space, and texture. But one thing that stood out to me was something he said in his introduction. He prefaced his talk by saying that many gardeners don’t take into consideration the needs of the plants when they work in the garden--they walk into a garden center or nursery, pick a plant they like, take it home, and just plunk it into the earth without thinking about water usage, light requirements, space needs, etc.
This struck me particularly hard when I got home and looked at my own garden. I had planned it for months before actually building the box this spring, and I had sketched the “look” of it on paper deciding that the 3’ x 3’ space (9, 1’ x 1’ gridded spaces) would be designed as such:
Tomato Herbs Tomato
Eggplant Peppers Cucumber
Tomato Herbs Tomato
This seemed all well and good to me, until I realized--after the fact, of course--that I hadn’t taken into consideration that the tomato plants in the outside front positions might in fact grow too tall and shade my peppers out of the sun.
At first it wasn’t that big of a deal--everything was small--but after about a month or so, I realized that while everything in my garden was lush and green, the pepper plants hadn’t quite matured the way everything else had. Sure, they looked healthy, but that was about it. They were tiny compared to my giant tomatoes.
Next year will be different. I will consider the varying heights and light requirements of my veggies, and the peppers will definitely be front and center. For now, I’ll just enjoy my glorious tomatoes, and chalk this up to a learning experience!
Olivia Dunn, publicist
This struck me particularly hard when I got home and looked at my own garden. I had planned it for months before actually building the box this spring, and I had sketched the “look” of it on paper deciding that the 3’ x 3’ space (9, 1’ x 1’ gridded spaces) would be designed as such:
Tomato Herbs Tomato
Eggplant Peppers Cucumber
Tomato Herbs Tomato
This seemed all well and good to me, until I realized--after the fact, of course--that I hadn’t taken into consideration that the tomato plants in the outside front positions might in fact grow too tall and shade my peppers out of the sun.
At first it wasn’t that big of a deal--everything was small--but after about a month or so, I realized that while everything in my garden was lush and green, the pepper plants hadn’t quite matured the way everything else had. Sure, they looked healthy, but that was about it. They were tiny compared to my giant tomatoes.
Next year will be different. I will consider the varying heights and light requirements of my veggies, and the peppers will definitely be front and center. For now, I’ll just enjoy my glorious tomatoes, and chalk this up to a learning experience!
Olivia Dunn, publicist
Seed starting (asterisk)
This year, it seems mandatory for any lifestyle article to include tips on “how to save money.” The gardening industry is no exception, and one of the things that people tout to save money is starting your ornamental plants from seed. Most articles claim that it is “cheap and easy”. I won’t argue with “cheap”, but I’m beginning to add a big mental asterisk to “easy”. As in: “Starting things from seed is cheap and easy”*
*As long as you have exactly the right spot, sow the seeds exactly the right way, and don’t mind re-sowing three or four times. Oh, and those lovely pictures of fields of waving flowers on seed packets? Sometimes seed packets lie. (I know! There should be a law!)
This summer, I’ve been frustrated by poppy flowers. I love poppies of all kinds and in all stages of development, and only recently did it occur to me that I could buy some seeds and plant them in my garden! How exciting! It will be cheap and easy!
Two months after sowing: only a few scraggly seedlings. But, but, but! I did everything on the packet! Where are my fields of waving California poppies? Fortunately for my disappointment, I ran across a blog post by one of our authors, Tracy DiSabato-Aust.
She lists the Oriental poppy as one of her top 50 best plants, and gives some tips on how to grow them. She says to try a large quantity of seeds – ½ a pound or more - and to try direct-sowing the seeds in February or March.
This is good to know for my gardening plans for next year – now I just have to find out where to buy poppy seeds by the pound. Bagel stores?
Chani West-Foyle, Marketing Associate
Labels:
Color,
Flowers,
Ornamentals
Subscribe to:
Posts (Atom)